Tuning and configuring your bandsaw
to resaw wide boards or cut veneers
One use of a bandsaw is for cutting curves in relatively thin wood - sometimes called scroll work. Most any decent bandsaw, with a fairly narrow blade, will do a sufficient job. Of course, if you need to cut inside a "hole" or do very fine cuts with sharp turns, a real scroll saw works better, but is slower than a bandsaw, and doesn't handle thick wood.
Another use of a bandsaw is for rough cutting thick wood such as bowl blanks. A powerful saw with a sturdy, tilting table is a great help, but more important is a special blade. The blanks are often cut in green wood, so a thicker blade, with an even wider kerf, is required to keep the wet sawdust cleared.
In my opinion, the challenging bandsaw job is resawing... cutting thin pieces off wide boards, normally dry hardwood. The target may be a piece of wood 3/8 inch thick (such as the side of a small drawer), or it may be a veneer, well under 1/8 inch thick.
How thick?
If you choose to cut a board 1/4 inch thick, to "veneer" onto another structure, sooner or later it will likely separate, warp, or split (I have seen many examples in museums where 1/8 inch or thicker "veneer" has delaminated from the substrate). The differences in expansion and contraction of different types of wood, over the seasons, creates huge internal stresses that will try to pull the wood apart. On the other hand, if the decorative outer wood is very thin (the nominal thickness of much commercial veneer is 1/42 inch - .024"), the wood doesn't have strength to move sideways (properly glued down, it follows the movement of the underlying material), and expansion or contraction becomes a minute change in thickness.
There is no magic thickness, above which, you always have a problem, and below which you are always safe. As a rough guideline, if your saw cuts roughly, then start with 1/8 inch (.125") and by the time you have sanded the "veneer" smooth, you should be fine. If you can cut very smooth veneers (requiring minimal sanding), 1/16 inch (.063") is a reasonable starting point, although I occasionally cut veneer much thinner than that. Since a resaw kerf is often .05" to .06" (roughly 1/16 inch) this means you could get 6 or more veneers out of a 3/4 inch thick board.
Exception: I wanted to use commercial drawers for a project, but some of the drawers had to have shaker fronts - rounded 3/8 inch overlay on 3 or 4 sides, not available from my vendor. I bought drawers with cherry sides, planed the front thinner, and laminated premium 3/8 inch thick cherry wood on the front, with the necessary overhang. I am not worried about the fronts coming off, since it is cherry glued to cherry, with similar expansion characteristics, with the grain aligned, but I would not consider doing it if the species were different.
Where is the fence?
I am often asked whether the "product" cut from a block of wood should be left of the blade (along the fence) or right of the blade, with the stock along the fence. There are arguments for both. If the product is left of the blade, the fence does not have to be adjusted for each subsequent cut, but the work has to be smooth enough to rest firmly against the fence for each cut. With a cheap bandsaw that produced imperfect surfaces, I had to joint the stock before each cut (but I liked the approach since it gave me one "perfect" surface for each piece cut). With my good bandsaw, the cut is good enough that I typically cut 3-4 or more veneers before jointing the stock again. Those who argue that the veneer should be on the right and fall away from the stock as it is cut get good results too, and continue to have the same smooth side of the stock against the fence, but the fence has to be adjusted for each cut.
Laguna has a "driftmaster" fence that can also be installed on non-Laguna bandsaws, with easily precision-adjusted fence position. This fence makes it practical to cut veneers that fall away from the stock.
Factors for success
As we are cutting through a very thick (tall) piece, our success is determined by many factors.
A tall stable fence to keep the wood steady (Be sure your work piece is flat and smooth, so it rides well against the table and fence). The "point" fences (a vertical bar aligned with the tip of the teeth) allows you to follow a line on the edge of the board if your saw wanders, but the quality of the cut depends entirely on operator skill, compensating for the saw. A well-tuned saw allows you to use a flat fence, and cut thinner, smoother pieces. The accuracy of your cuts with the point fence is determined by the operator, the accuracy of your cuts with a flat fence depends on a well tuned saw.
Feather boards or operator(s) to keep the wood tight against the fence ahead of the blade. With difficult cuts I sometimes get someone to help hold the wood against the fence.
Steady feed rate. If you will be doing a lot of resawing, consider a power feeder. People who use a power feeder on a bandsaw swear by them. Be sure you can adjust the feed-speed of the feeder to match the requirements of your saw with each particular piece of wood.
A blade that does not deflect or wander sideways
When the blade is pushed to the rear (while cutting), it will tighten the rear of the band, and reduce the tension on the front (teeth) thus making it easier for the teeth to wander. A wide blade helps to resist deflection to the rear, thus reducing the sideways deflection of the teeth.
High blade tension to minimize deflection
Few teeth with large gullets to clear the sawdust out - when resawing you may be producing more than 10 times as much sawdust as a normal cut, and if the kerf is packed full of sawdust, the blade will seek an easier path. Don't assume the sawdust is soft and will stay out of the way.
Good bandsaw tuning
The side-guides should not touch the blade constantly (to prevent heat build up), but should be VERY close to prevent deflection (if a folded piece of paper fits between the blade and guide, it is too far away). Mine act "nervous" - with the saw running but not cutting, they are so close to the blade that they twitch from moving air and dust. Front-to-back, the side guides should be close to the gullet since that is the part that wants to wander. Euro guides, roller guides, ceramic guides, cool blocks, wood blocks soaked in mineral oil, all work fine, even though everybody has a favorite.
The thrust bearing behind the blade should only touch the blade during the maximum cut, but should be close enough to prevent the gullet and teeth from touching the side guides when they are pushed to the rear by the force of the cut (some argue as close as 1 mm, others as far as 3 mm - 1/8 inch - behind the blade). Note that if the blade is poorly adjusted, and runs hard against the thrust bearing, there will be heat and stress on the gullet, leading to cracks in the gullet, and eventually a broken blade.
The fence should be adjusted parallel to the natural cut angle of the blade. New blades normally will cut "straight ahead" but as the blade wears, and the teeth are bent by the tires, the direction the blade cuts naturally is at a slight angle. Draw a line about an inch from the edge of a board, and cut it without using the fence. When you are "half" way through and are pushing straight into the blade, stop, and notice the angle of the board - this is the natural cutting angle of the blade. The fence should be adjusted to that angle.
With crown tires, the blade should be on the center of the wheel. With flat tires, the teeth of a wide blade hang off the front edge of the wheel. It doesn't make sense to try to have the teeth of a very narrow blade hang off the tires, so many users with flat tires put the back of a narrow blade at the same place the back of a wide blade rides, to simplify adjustment of the guides.
Smooth tires and balanced wheels. The surface of the wheels must be absolutely smooth and stable when spun without a blade (if the tire has a bump, sand it out). If the wheel is out of balance, the same point will always be at the bottom when the wheel stops - get it balanced (perhaps as simply as wiring a washer or two to the right spoke of the wheel).
A sharp blade - only expect a few hours use (as low as 1-2, never more than about 5 hours) from a normal steel blade, and normal blades are generally not worth sharpening. A carbide tip blade is a good investment if you will be using it a lot, and have a saw that can provide good tension and alignment. Some carbide blades can be sharpened, but I have had reason to replace carbide blades before they need to be sharpened. On one forum, a user told about a place that sharpened carbide bandsaw blades at a modest cost, but admitted that they didn't cut as well as new after sharpening - sorry, no sale. The "good-as-new" sharpening services are close enough to the price of a new blade that I haven't bothered.
Blade lubrication - you don't need (or want) a wet blade like metal cutting bandsaws or some sawmills use, but most vendors recommend lubricating the blade. Some folks spray some cooking "Pam" on a rag, and wipe it on the blade while moving it backwards by hand. This apparently does not leave enough residue on the wood to interfere with any finish. I wax my blade with furniture paste wax, similar to the way I care for other metal woodworking surfaces (such as the cast iron tables).
The back edge of some blades are rough, and can be "tuned" or rounded slightly with a sharpening stone (some people buy a special "stone on a stick"). If you have a Lenox carbide blade, do not use a stone... the blade is factory rounded in the back, and Lenox considers the grinding of the back a "modification" of the product, potentially voiding any warranty.
Choice of blades
For resawing, the width of the blade should be close to the maximum the bandsaw will handle. A smooth cut is very important, so an investment in a carbide tip blade is worthwhile. To use the maximum size, every guide, adjustment, and clearance may have to be in a specific "perfect" position. Therefore, to allow easier adjustment, some argue that one size less than the max is ideal. As you move to wider blades, they also become thicker; I stopped at a 1 inch wide blade rather than the 1.5 inch my saw will handle, to keep the thinner blade.
The number of teeth per inch (tpi) depends on how fast you are sawing and the thickness of your workpiece, but for starters, consider 3 tpi a large number for resawing.
How long does a carbide blade last?
A recent discussion on the MiniMax User Forum provided some insight
A person doing a lot of resawing made the comment that "a single person in a furniture shop may not have to change their blade for years." That is me - I cannot contribute personal experience to lifespan for heavy resawing.
Further discussion on that forum suggested that 600-800 linear feet of resawing curly tropical hardwood, 6 or more inches high, might wear out a blade for resawing, but it would still be adequate for other less demanding uses. Highly abrasive wood might kill a blade in 400 linear feet. Those results were confirmed by another user, for both the Lenox TriMaster and Woodmaster CT. That doesn't sound like much, but it is probably more than a full day's work, and equates to a blade cost of about 15 cents per linear foot resawed.
My current favorite blade (1 inch Lenox Woodmaster CT) with 1.3 tpi, .035 inches thick, kerf .051 inches. The Woodmaster CT only comes in 1 inch, 2 inch, 3 inch, etc. The 1 inch wide blade is now also available in 2 tpi. Another favorite is the Lenox TriMaster which alternates between 2 and 3 teeth per inch, .035 thick, and comes in a wide choice of widths including 1 inch. The TriMaster has more teeth, with larger pieces of carbide for each tooth (so the kerf is .065 rather than .051 for the Woodmaster CT), and with the extra carbide costs proportionally more than a Woodmaster CT. My bandsaw will support a blade wider than one inch. However, even though wider blades are theoretically better, the readily available wider blades are also much thicker, so I only use 1 inch wide blades.
My favorite source for Lenox carbide tip blades is Industrial Blade in California - www.industrialblade.net - excellent service and the best prices I have found (1-800-SAW-BLADe).
The "Wood Slicer" (from Highland Hardware), also sold as the "Bladerunner" by Louis Iturra (904-642-2802) is a non-carbide blade that has a cult following for resawing dry hardwood. It is a very thin blade (.022 inch, .03 kerf) which removes less wood and therefore requires less power. It has variable tooth pitch which runs quieter and smoother, and requires less tension (20,000 psi - see below), With less metal doing the cutting, it doesn't last as long, but it is far less expensive than a carbide tip blade, and gives very smooth cuts.
On one forum, one person had great results with the Laguna Resaw King, but another person's Resaw King blade broke, and Laguna said it was his fault for excess tension, even though they had refused to specify the recommended tension. I have tried the Resaw King from Laguna, but prefer the Lenox blades.
If you are sawing wet (green) wood, such as milling lumber or cutting bowl blanks, you need a wider kerf (the wet sawdust expands) and perhaps a thicker blade. None of the carbide blades I have seen are suitable for cutting green wood. Of course, for bowl blanks you will be cutting curves, and therefore want a narrower blade as well. Many people use a 3/8 or 1/2 inch wide blade for bowl blanks, in a special "model" blade designed to cut green wood (such as the AS series from Timberwolf).
For non-carbide blades I use Timberwolf blades from Suffolk Machinery. They have been highly regarded for years, but there are some recent complaints about lower quality welds. Based on my dealings with them, I bet they would fix that and apologize, but I haven't had a problem. They are designed to operate with a lower tension (about 7-8,000 psi), which can be an important factor with cheaper bandsaws. Suffolk Machinery is the importer/distributor, has a website with lots of good info about Timberwolf blades. For years they would only take orders by telephone (1-800-234-7297 in New York), with very knowledgeable operators, quick service, and low prices for these "premium" blades. Recently they have added the ability to select and order blades on-line. Watch their web site for occasional "buy a few and get one free" sales.
Some of the woodworkers I highly respect have started to recommend Ellis over Timberwolf, as a very good, far less expensive blade. I have not personally tried them, but the recommendations are so vigorous and widespread, I will certainly give them a try (when my supply of Timberwolf blades is depleted). One user suggests calling them (800-383-5547) with what you want to do and they will help you select the best blades.
Blade Tension
The minimum tension for a safe cut is slightly more tension than just enough to make the blade stop fluttering, no matter what type of blade. Set the guides as far apart as possible, and increase the tension until the blade runs smoothly - or decrease the tension until the blade starts to flutter, then increase it slightly. (On many saws you have to change the tracking after changing the tension.) Timberwolf recommends that you use their blades at this minimum tension, often around 7-8,000 psi, while others often recommend a higher tension if your saw can handle it. The Bladerunner/Wood Slicer typically is run at 20,000 psi. The Lenox carbide blades are typically run between 22,000 and 30,000 psi - I shoot for about 25,000 psi.
Tension theory
There are three confusing factors involved in blade tension...
Force is the pull of the spring - pounds. It is proportional to the amount the spring compresses until the spring's coil loops contact, so can be measured by the amount the end of the spring moves - the position of the end of the spring. This is what moves the bandsaw tension indicator. Some people change their bandsaw springs to get more tension, but be sure you don't increase it so far that you damage the frame.
Stress = Force divided by area of cross section - pounds per square inch. This is the "tension" we are looking for. If a blade is twice as wide, then there must be twice as much force to get the same stress/tension on the blade. If the blade is twice as thick, there must also be twice as much force. And, of course, twice as wide, twice as thick needs 4 times as much force.
Strain is the amount the blade stretches, proportional to stress, so this provides a convenient way to measure blade tension (as opposed to just measuring the force of the spring).
Stress (not force) is the key factor in blade tension. A low tension blade typically runs around 7,000 psi stress. High tension blades often run as high as 25-30,000 psi. The force you have to apply (the tension knob on the saw) is a lot greater for a large blade, but the tension, measured in psi, is the same for the large and small blades. Since it is related to the cross section area of the blade, the stress doesn't depend on the thickness or width of the blade, but the force required to achieve that stress (blade tension) does depend on the width and thickness of the blade.
Bandsaw tension gauges measure the compression of the spring (proportional to force), then indicate the appropriate setting for different blade widths. Most bandsaw gauges don't specify what thickness blade they are calibrated for, which is why they may be perfect for one blade, but are often misleading for other blades. My bandsaw's indicator says it is for a blade .019 inches thick (I have never had a blade that thin). Therefore, on my saw, if I use a ½ inch blade .035 inches thick, the tension indicator on my saw needs to be set for a one inch blade to get the recommended tension on the thicker half inch blade.
Measuring stress is done by measuring strain, in other words, measuring the amount the blade stretches. Here is the science behind it: The elasticity (Young's modulus, E) of most steel is 30 million psi. The elongation L is the Stress divided by E. If we have 30,000 psi stress (tension) on the blade, the blade will elongate (stretch) 30,000 / 30,000,000 or 1/1000 of it's length. If we measure over 10 inches, we should see 10/1000 or .01 inch stretch in those 10 inches. If we see .005 inches elongation over 10 inches, we have 15,000 psi blade tension. For each .001 inch of elongation measured over 10 inches, we have 3,000 psi of blade tension. Measuring over the longer distance is generally more accurate. Once you establish how far apart you can connect a measuring device to your blade, I suggest making a chart for each thousandths of an inch strain (stretch), and the corresponding stress (blade tension).
On my saw, I can easily measure 12 inches apart. Using the numbers above, that means I should get 12/1000 or .012 inches stretch at 30,000 psi, or .001 inches for every 2,500 psi of blade tension. Therefore if I want 25,000 psi, I tighten the blade until I get .01 inches stretch. It doesn't matter what size blade I use, the .01 inches stretch is 25,000 psi. Of course, if I have a big blade, I will have to use more force - tighten the wheel a lot harder - to get the same blade tension than the force I would need to get that same tension on a small blade.
Measuring should be done with the blade at a constant (room) temperature... when the blade gets hot through use, it will expand - comparable to the amount it stretches from tension.
Simplistic Tension calculations
After you go through the calculations above, you will find that for every 3,000 psi tension, your blade will stretch 1/10,000 of it's length (1/10,000 of any portion of the length you measure). If you are measuring over 10 inches, that portion of the blade will stretch 10/10,000 inch for each 3,000 psi tension (.001 inch). If you measure .003 inch stretch in that 10 inch section, you have 9,000 psi overall blade tension. .004 inch stretch is 12,000 psi tension. .008 inch stretch is 24,000 psi tension. .01 inch stretch is 30,000 psi tension.
If you can measure over more than 10 inches, the reliability of the calculation improves; just expect a proportionally larger amount of stretch.
When you attach the gauge the blade is likely loose. As you tighten the blade, the "floppy" looseness will go out first. Start measuring the stretch when the blade starts to stretch instead of just becoming straight. It is hard to describe but easy to see.
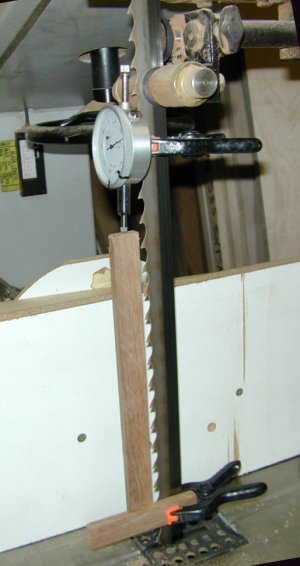
Simple Tension Gauge
You can buy a bandsaw blade tension gauge (that really measures strain) for $135 to $350, or you can make one from a cheap ($7) dial indicator and a couple spring clamps. Usually there is a connector on the back of the dial indicator, such as this, that can be clamped to the blade.
An L or T shaped set of scrap wood allows the probe to be connected to the blade as far away as convenient (for greater accuracy), with whatever offset is required to align with the dial indicator. In my case I use a scrap of wood that allows the clamps to be 12 inches apart.
Therefore the chart for each thousandths of an inch stretch with the clamps 12 inches apart indicates 30,000,000 /1000 / 12 then .001 inches stretch = 2,500 psi blade tension, .002 inches stretch = 5000 psi, ... .009 inches stretch = 22,500 psi, .010 inches stretch - 25,000 psi, etc. That chart was taped to the side of my machine for a long time, but is so simple that I just remember it now. (Remember that the dial indicator doesn't have to be set to zero... just note the difference as you tension the blade.)
Or you can do what the majority of bandsaw users do - just make some cuts and if you get good results, be happy and keep going.