| SoloWoodworker |
Page last updated ©2023 Charles Plesums Austin Texas USA | |||
We receive a small commission if you click on the ads (selected by Google), or if you link to a product recommended by us.
| Home | Why | Business | Woodworking | About us | Contact us |
Few steps are hated by the woodworker as much as sanding, yet this part of the project probably has as much to do with a pleasing result as any... perhaps it is the most important. Therefore we invest in tools to minimize our pain. See the separate web page on the associated abrasives.
To get a flat surface, you need to have your sandpaper backed by something flat... hand sanding with a bare sheet of sandpaper will not work. Various tricks are recommended such as wrapping a piece of sandpaper around a board with a cork face. For years I used a small board with a permanently attached piece of coarse sandpaper, to keep the working sandpaper from slipping. But realistically, for flat work, I usually jump to the machines.
For curved and profiled surfaces, some people like sanding sponges... an abrasive on one side of a soft pad. My wife was much more willing to help sanding if I had abrasive sponges available for her. But for myself, I just fold a sheet of sandpaper into quarters. Of course, there is a trick here, too... you don't want abrasive to touch abrasive, so when you fold in quarters, cut on one of the fold lines, from the edge to the center. Then you can refold the paper so the abrasive "inside" does not touch other abrasive - only the back of the paper. As the abrasive wears, it can be refolded with the unused portion on the outside, and the worn part on the inside still provides a convenient degree of stiffness.

These are the low cost vibrating or oscillating sanders, often with a rectangular pad the size of 1/4 sheet or 1/3 sheet of sandpaper. The old fashioned vibrating sanders will wear out your hands in no time. The motorized oscillating sanders work pretty well, and the rectangular pad allows them to get into corners. I have worn out a couple of them, and currently don't have any in my shop. There is a trick here, too... Since the paper clamps to the sander, I found a strip of masking tape, on the back of the paper where it is clamped, dramatically extended the life of the paper.

These are the workhorse of most shops. Normally a round pad oscillates (smaller oscillations make finer marks, larger oscillations cut more aggressively - I prefer about 1/8 inch or 3 mm oscillation. In addition the pad rotates relatively slowly to make a pseudo-random pattern in the sanding marks. These sanders can go across grain as well as with grain - I built my first kitchen before they were invented, and spent countless hours hand sanding up to each joint in the face frames, since I couldn't sand across grain!
Since you want tiny swirls in the sanding pattern, you should not only get a sander with a small orbit, but you should move it slowly across the wood - generally in the direction of the grain. One slow pass is far more effective than multiple fast passes.
You will spend many hours using your Random Orbital Sander - ROS. I have heard many stories about potential or actual injuries to the hands and wrists from the vibration of cheap sanders, including $60 units from name brands like DeWalt, Porter-Cable, and Black&Decker. Fortunately my first ROS was pretty good - a 5 inch Makita that cost about $100 - and I never had the problem with my hands that I heard from other people. When my two Makita's were ready to be rebuilt, I went to a Festool ROS, which is also very easy on the hands, and will hopefully last longer. (I still had the Makitas rebuilt, and like having multiple sanders available in my shop.)
A 5 inch diameter sander is pretty common, but a 6 inch sander has over 40% more sanding area than a 5 inch - and if you are going to spend a lot of time sanding, larger is good. There is much less temptation to tip the larger 6 inch sanders - a practice that must be avoided. In addition to my two Makita 5 inch ROS, my Festool is a 6 inch sander. I love that Festool sander, but hate their sandpaper... see the separate web page on that topic.
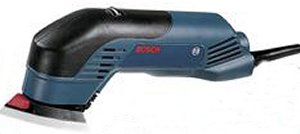
If you use a random orbital sander, how do you get into the corners? One solution is "by hand." Another is to break out the finish sander ... the one with the rectangular pad. A third solution is a "detail" sander. I had a cheap detail sander, which ate lots of sandpaper (available locally), and irritated my hands and me. It went the way of ugly tools - sold on Craig's List. I swore off detail sanders for years, and did corners by hand. Then, for whatever reason, I decided to try again. This time I got a Bosch 1294 VS. It works well, uses very little sandpaper, and has good dust collection. It also has a neat feature - the triangular pad clips on, and can be installed with any of the three corners pointing forward, making even better use of the sandpaper. The bad point is that the sandpaper isn't normally available locally, but a modest stock lasts a long time, and when you mail order the sandpaper from the parts depot, get an extra pad or two, so you can change grits quickly by just switching pads.

These are tools for the gross removal of wood, and rarely are used in fine woodworking. There are a few experts who have developed the skill to tame this machine in routine use, but not me. They probably went to the same school where experts learn to cut a smooth edge with a carpenter's axe. I actually have the cheap unit shown here, and probably use it every couple years. The small wheel in the front allow it to get into tight spaces - and if I am using this tool it is probably because I am trying to rescue myself from a mistake, which may have tight spaces.
Dust collection is notoriously bad on belt sanders. Small units typically have a belt that is 3 inches wide and 21 inches long (a few as small as 3 x 18), larger units most often have a 4 x 24 inch belt. If you select one, you might want to focus on 3x21 or 4x24 units for readily available belts.
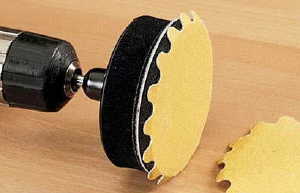
Yes, it is as simple as it looks. A very soft flexible sponge, often 2 inches in diameter, with velcro on one side, and a shaft for an electric drill on the other side. You can use any old drill, but experts recommend an offset drill. I used my regular battery operated drill for a long time, until I saw a variable speed offset drill for "next to nothing" at Harbor Junk. That was all it was worth as a drill, but I leave it plugged in next to my lathe, dedicated to sanding.
If you have a perfectly round piece of abrasive, the edges can cut grooves in the bowl, which will make you very unhappy. Therefore vendors sell "wavy edge" sandpaper. And the green "heavy" wavy edge discs are worth the extra cost if you are buying them. But (being a cheapskate), I have found that the centers of the ROS pads wear far less than the faster moving edges. So if you cut the center out of a worn 5 inch disc, cutting through the dust collection holes, you will get a "free" disc about the right size with wavy edges (not pretty wavy edges but they work fine).

This is at the head of the list because it was one of the first machines I bought as I started making furniture. It was cheap, and is now rarely used, so it is one of the last machines I would replace. However, it's larger brothers, with a larger flat sanding surface and a larger disc (and more stable tables to precisely align pieces) make this a fair utility tool for flattening small pieces, and even making small scarf joints or miters in small trim or inlay pieces. The end of the belt can be used for sanding inside curved surfaces. The larger units are probably much more useful and versatile, but can cost well over $1000, and take more shop space and power.
If you take the large brother of the sander above, and tip it sideways (so the belt runs sideways and the working area of the belt is vertical) and make a sturdy table square to the belt, you now have an edge sander... a quick way to perfect the edge of a board before a glue up, etc., if you are not into hand planes. It produces a smoother edge than most saws, and without the scallops of a jointer. Then you oscillate the belt up and down slightly, so the belt wears evenly, heat is dissipated more readily, and any imperfections in the belt don't scratch the work as badly, and you have the deluxe version of the oscillating edge sander. I don't have one, but people who build a lot of furniture swear by them.

If you have a lot of inside curves that need sanding, then an Oscillating Spindle Sander is for you. Choose the diameter of the spindle for the work at hand, and the spindle spins as well as oscillating up and down to distribute wear on the spindle and dissipate heat. The smaller units, like this, used to be called "BOSS" for Benchtop OSS, but it appears that one vendor has now Trademarked the term. Basic units are around $200-400, but larger floor-mounted units can cost much more.
If you only do a little sanding of inside curves, small sanding drums with abrasive cylinders can be purchased to use in a drill press. (I actually saw a drill press listed as a sanding tool, even though it puts a side force on the quill that the drill press wasn't designed for.) My first drum was fairly expensive, but then I found a cheap set of different diameter drums and abrasive cylinders (Wal-Mart?) that have satisfied my needs for years. I recently had to do a fairly long inside curve, keeping the edge at a right angle to the face, so I mounted the sanding drum in a shaper, run at a relatively low speed (don't try this in a router table... the slowest speed of a router is around 10,000 rpm, far too fast for these drums.) A 5 hp shaper and a 4 inch dust collection hose looked silly with the little sanding drum, but it worked just fine.
A drum sander serves three major uses in a woodworking shop...
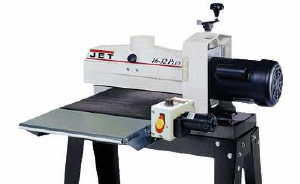
Many shops, including mine, started with a Performax 16/32 like in the picture. It is a 1½ hp drum sander from WMT (now sold under their Jet brand rather than Performax). The 16 is the width of the drum, but since it is cantilevered from one end, a wider panel (theoretically up to 32 inches) can be sanded by making two passes, in opposite directions. Since the operator feeding the panel isn't perfect, the manual suggests tipping the head slightly so that there is a crown a few thousandths of an inch in the center, to reduce the risk of a line in the center. I found that tip helpful for another reason - I could put a board through near the open end, them flip it and sand the back of the board farther down the drum, without always adjusting the thickness. Jet has a larger version, 22 inches wide, with the potential for sanding pieces up to 44 inches wide. Delta has a competing unit, but the table moves rather than the sanding drum (so any infeed/outfeed supports have to be adjusted as you work. Expect to spend around $1,000 for one of these units.
With the relatively low power - 1½ hp - too deep a cut requires slowing the feed rate, which can lead to burning. Even though the drum is hollow with air blowing through it, the drum and paper can get hot. Some of the newer models have a device to automatically slow the feed rate when the load on the sanding drum motor gets excessive, but without it, a cheap ammeter can be added to assist in controlling the feed speed. Even with this relatively low power, the amount of sawdust produced is amazing... don't even think of using this sander without a dust collector.
I found that 120 to 150 grit, or perhaps 180 grit, was a good range for a sander like this. When I tried to sand to 220, the risk of burning seemed to outweigh the advantage of slightly less time with the ROS. Some people use a very coarse paper on this type sander to clean recovered or painted wood that is too dirty go go through the planer.
The feed is a wide belt of sandpaper, to keep the wood from slipping as it is fed. I learned the hard way to keep the feed belt covered when it wasn't in use - it costs about $50 to replace, and mine deteriorated sitting in the sun at the garage door for a couple years! That thin feed belt, with a flat surface under the belt, with stiff sandpaper tight on a smooth aluminum drum, leads to very precise thickness. A simple test is to run a board through a second time without adjusting the sander. The amount of material removed in the second pass, in my experience, was extremely small.
I finally did upgrade my drum sander to a 5 hp unit, 38 inches wide. My 2 hp dust collector struggles to keep up, even when only removing a small amount of wood. The abrasive is attached to the drum with "hook and loop" so there is a slight padding under the abrasive. The feed belt is rubber - like used on commercial sanders. The sander works very well for me, but the exact thickness is probably not perfect... with the padding above and below the work, a second pass without adjusting the sander removes more wood (seems like as much as the first pass), and the third pass still removes a significant amount of wood.
A recent forum discussion suggested that an aggressive cut with 150 grit would remove .005 inches in hard wood - a deeper cut would overheat the drum and paper, and cause a whole range of problems. That discussion led to a claim that 1/64 inch (.015 inches) could be removed with a 15 hp wide belt, using 60 grit paper. It also concluded that .010 inches was very aggressive at 100 grit. And if the panel being sanded were wide, lots of horsepower would be required, and massive dust collection.

The "ultimate" sanding machine in most shops is a wide belt sander, typically with a belt 37 to 50 inches wide, and 5 to 8 feet long (costing close to $50 each, but lasting many months even in a factory). A very small motor on these sanders is 5 hp, and most run 10-20 or more HP to drive the belt, and another 1-2 hp to feed the work (and another hp to raise and lower the feed table). The longer belt gives the abrasive time to cool before it hits the work again, allowing more agressive sanding. In some shops, this is used as a thickness planer. When I was talking to a machine designer at a trade show, he said "these machines should never be used as a thickness planer - they are far from ideal for that purpose - but so many people do it, that if we said to not do it, people would buy the competitor's product." One modest wide belt sander I was dreaming about cost close to $10,000 and had four 4" dust ports - far more than I could handle with my dust collector.
Some drum and wide belt sanders have two or more sanding heads/drums/belts. If I were in a factory where all work arrived at the same thickness, so I could adjust the first "coarse" belt precisely so only one pass is required, (the second "fine" belt would stay adjusted to follow the first belt), then the dual head sander may pay. Since I do all custom work, I have no desire for more than a single head, and am willing to do multiple passes.
Abrasives are as important as the machine or person using them. Be sure to see our separate web page on abrasives.
This site (layout and contents) is ©2008-2023 by Charles A. Plesums. The material is free for personal use. Questions? contact us. |